I hate to say this, but I am kind of happy this is over. I guess at the beginning of this experience I did not prepare myself for the difficultly of this project. My goal was to complete 5 projects by the end of 30 days. Well I completed 7! I feel so accomplished. Not only do I get the satisfaction of saying I completed my goal, but also I now own a Love Tub, ottoman, braided bracelet, roman shade, candle holder, toy box, and Toms!
On average I spent 4 hours on each project. This estaminet only includes the time actually doing the project. It does not include: the time spent gathering materials, the time spent thinking of something to upcycle, the time to take pictures for tutorial, or the time spent to put up tutorials. That's a lot of time. Need I need to mention how much each project cost. Nope! I will just take this time once again to thank my awesome PARENTS!
What are the benefits of upcycling? DIY/upcycling projects are great! They save money and are unique. I got to spend more time with my mom and my dad because of this project. We also worked as a team (a team that my argue about which way we should do it because we are stubborn and want to do it our way then say NANANA I told you I was right!) Every Saturday morning my mom and I would go to Goodwill/yard sales to find something to upcycle. I loved the feeling of making something myself and saving it from just being wasted. Not going to lie I liked showing off what I made to others; however, I was nice enough to share with you how to do it yourself! On a side note, I learned how to spell tutorial though this project! At the beginning I would always spell it 'tourorial.' Not really sure why, but I just realized through this post that I can now spell tutorial without even thinking about it!
I hope I inspired you guys. If not that, I hope I have entertained you. Thanks for your time!
Mikayla Carpenter
Tuesday, March 27, 2012
Monday, March 26, 2012
The longest upcycling project EVER.
I have been working on the upcycling project for awhile now. In a previous blog I asked for suggestions on what I should try to upcycle. Old magazines was a suggestion and I decided to tackle it. Yep, I took old magazines cut out strips of paper, rolled them up, glued them together, and made a candle holder. Throughout this whole process until the day I started to put them together I thought I was going to make this into a trash bin... NOPE! That would have taken even more time. So I made a candle holder!


First you must take a strip of old magazine and fold the sides to be overlapping in the middle.

I would roll the magazine around a pencil or pen or something circular (besides your finger) because it gives it a more clean edge.

Now the bottom is a solid huge chunk of strips of magazines. Then the sides are made up of the rolled up magazines.

This is a top view of the candle holder.

I only built up the sides about 2/3 of the way. Also, if you don't want it to flare out towards the top then glue the circles straight on top of each other.
Helpful Tip: the strands of glue that a hot glue gun creates are super annoying...take a blow dryer to them. They melt within seconds.
Turn your blinds into a Roman shade!

Some of these blinds were broken at the top. We thought 'hmmmm what can we do with this'? *idea pops in our head* ROMAN SHADE!

We took out the broken blinds and a few others to give it a spaced out look. Next, we picked a fabric we liked and hot glued the blinds to the fabric.

This is how the Roman shade looks hanging up in our window! I like it. It adds a little bit of class to boring blinds.
One. More. Day.
Man, words can't describe how I am excited to get this project over with. I mean I love you guys and appreciate you for commenting/viewing my blog, but this writing a paper and blogging at the same time is getting to me.
On a side note, I have been trying to calculate how much time and money (my mom, my dad, my uncle, and I) we have put into this immersion project. I have found several benefits from this project! So tomorrow look for there to be a conclusion to this totally awesome blog.
On a side note, I have been trying to calculate how much time and money (my mom, my dad, my uncle, and I) we have put into this immersion project. I have found several benefits from this project! So tomorrow look for there to be a conclusion to this totally awesome blog.
Friday, March 23, 2012
What is your favorite DIY/upcycling project from Pinterest?

It is a pallet from a factory turned into a coffee table. Of course my mom was able to get a pallet from work, we just ran out of time. I love the fact that they are not trying to hide the fact that it is a pallet. They are like BAM it's lime-green and awesome sauce! This is the link to this upcycling project (http://pinterest.com/pin/156148312050240583/)
What is your favorite Pinterest DIY/upcycing project? Leave the link in the comment box!
Thursday, March 22, 2012
I...am...tired.
Sheesh! I am tired. Who would of thought doing these DIY/upcycling projects would be so much work? First, I have to have an idea of what I want to do. I have to plan out which project I am going to do. Then I collect the materials. The most time consuming part is actually doing the project. I have to remember to take pictures of each project I do. Lastly, create a tutorial for my audience. I do not have the space here at college or the materials or the money so I go home each weekend to do at least one DIY/upcycling project. Then I start the routine all over again. If I didn't have my mom and dad (mainly my awesome mom) helping me get supplies and actually helping me do the projects I don't know what I would do! I know I wouldn't have this many projects done by now. This week has been rough! Working on my research paper while trying to keep up with my blog. Not to mention, I have a foundations and drawing class I have to do projects in also. I am getting burnt out. But have no fear! The end is near!
BIG shout out to my lovely parents! Thanks for the help!
BIG shout out to my lovely parents! Thanks for the help!
Wednesday, March 21, 2012
Customize Your Toms
Toms.
They are shoes made out of canvas. I love my Toms because they are easy to get on and match just about everything. But my Toms are not Toms! They are Aloha Islands (a brand by Shoe Show). They look just like Toms just a different man on the tag. Also, Kohl's has a brand call So! This is how I made my 'Toms' custom.


They are shoes made out of canvas. I love my Toms because they are easy to get on and match just about everything. But my Toms are not Toms! They are Aloha Islands (a brand by Shoe Show). They look just like Toms just a different man on the tag. Also, Kohl's has a brand call So! This is how I made my 'Toms' custom.

This is my quick sketch of the owl and what colors I plan on painting where. Do the planning now so that you do not mess up! I used the little bottles of fabric paint.

I used a washable marker to map out where the owl was going to be. Do not put the details on the inside because, as you see here with the purple, you just paint over it. Think background first then the details.

Next, add the body part, wings, and eyes.

This is me painting the shoes!

I added hearts the the back of the shoes!

This is the finished product! You can design them however you want. Just takes a little planning. It took a total of about 3 hours to do the whole project. It only cost $20! I actually made these shoes for my RA as an appreciation gift! She loved them. I encourage you to do this project and let me know how it goes.
Tuesday, March 20, 2012
I love Pinterest!
I love Pinterest! Pinterest is an online pinboard where you pin pictures (when clicked on they link back to the website they came from) of whatever interests you. Whenever I am on Pinterest, I always find something that looks yummy or that I want to make. The way I see Pinterest is it's like you are chatting with your girlfriends about the cute dress or the hot new actor you found. I also see it as a neighbor you trade recipes or DIY ideas with. The best part is all you have to do is get on Pinterest!
Pinterest's audience is made up of over 80% women; therefore, most subjects on Pinterest are geared towards women. I told a guy friend of mine about Pinterest and his response to me was the first thing he saw when he looked at Pinterest was cupcakes and a naked Bradley Cooper sitting in a bathtub. Yep, that sounds about right.
Since posting my upcycling projects to Pinterest my blog has gotten more views. Also, my upcycling projects were repinned and liked by people I didn't even know. One girl thought my Love Tub was meant as a dog bed. I guess it could be but that is a lot of time and money for a dog bed. Do you use Pinterest? What do you think is so appealing about Pinterest?
(http://pinterest.com/)
Monday, March 19, 2012
Factory storage bin turned into a toy box!
My mom works at a factory in my hometown. She saved this storage bin from being thrown away! Since my dad has 12 other siblings, I have plenty of baby cousins. So we decided to make a toy box for my little cousin!

This was the storage bin at the beginning.

First we spray painted the inside a dark brown.

Next we used a staple gun to attach the cushioning on the outside, then staple the material on top of the cushioning. You only staple the mater at the bottom of the storage bin, then pull the material over the side and staple it on the inside of the bin.

We used two different materials for the toy box. Also, we added ribbon on the corners of the box to give it more of a smooth look.

After everything is done, this is what it looks like! So think before something is thrown away!
Tuesday, March 13, 2012
Quick DIY Braided Bracelet

1. Pre heat the oven to 230 degrees.
2. Take out the amount of clay you want to use and knead it in your hands. This will just get it warmed up and easier to work with.
(I am using two colors, but you can pick up to 3 different colors)

3. Roll out 3 sticks of clay.
IMPORTANT NOTE: You will need more than the length around your wrist. You will be braiding the clay together so you must take into account the overlapping of the clay. It is best if you make the sticks longer than needed because you can always take away the excess clay.

4. Push the sticks close together and smash lightly together at the top.
5. When you go to braid the bracelet, make the braid as tight as possible without tearing the clay.
6. Connect the beginning and end of the bracelet together by smashing lightly the two sections.
7. Bake in the oven for 30 mins. This will harden the clay and make it permeant.

This is the finished product! Cute, simple, and easy! I encourage you to make your own! Let me know if you like this tutorial and I am always up for suggestions!
Monday, March 12, 2012
A coffee table upcycled into an ottoman!
Yep, you heard right! I took a coffee table and turned it into an ottoman! The first Saturday of the month is 50% off store wide at Goodwill! So, let's just say this is the prime time for my mom and I to go Goodwill shopping. I am not afraid to admit it. I SHOP AT GOODWILL! My mom found a round coffee table for $7! This is how my mom and I turned a coffee table into an ottoman!


This was the coffee table at the beginning.

We started off by cutting foam for the cushion part of the ottoman. We added some material around the side of the coffee table. All of which was attached with spray adhesive.

Next, we stapled some cheap white material around the cushion so we could contain all of the cushioning. The material for the outside of the ottoman is outdoor canvas. This material only cost $13 a yard. You just pull the material up the side of the table really tight, then take a staple gun to staple it to the bottom.

You have to cut the material where the legs insert. (This is just depending on what type of table you are using to make an ottoman.)

Lastly, we stained the legs of the coffee table a dark brown. Of course I had to sand off the old paint first. Just dip an old rag into the stain then wipe WITH the grain. I think it looks better than painting the legs.

Put it all back together and BAM! You have a ottoman!
Sunday, March 11, 2012
Upcycling all around us!
First off, I am sorry I have neglected my blog for a couple of days. I was in Orlando, Florida for spring break! I noticed some great things while in my hotel and Disney World. My hotel had a trash bin and a recycle bin in the room. Also, in Animal Kingdom there were paper straws instead of plastic! While I was at the Indianapolis airport, I noticed there were bar stools made from old car rims. It was great to see upcycled items being used in public areas. It gives places a unique look and it is environmentally friendly! What cool upcycled items have you seen when you are out and about?


(This image is from http://www.crtnz.co.nz/)
Saturday, March 3, 2012
Check out how I turned a claw-foot bathtub into a couch!
I must admit that I got this idea from etsy.com. It was such a great idea I couldn't help myself from making my own! Let's think for a minute ... where would this bathtub be if it wasn't for me?


Yep, it would be in a landfill.

Or it could be stored in a creepy basement.

In this photo it is in my uncle's garage waiting for its make-over!

At first we did not know how we were going to cut the side of the tub. The side we wanted to cut off is the side we practiced cutting on. We found that a 4 inch flat wheel grinder worked the best. Oh, this is my uncle Chris!

Next we made an outline for my uncle Chris to line up with while cutting the tub.

Uncle Chris cutting the tub!

Some of the porcelain chipped off and the cast iron was very sharp after the cut. So my dad beveled the edges of the tub.

We cleaned the tub off, then painted the outside a 'frosty blue.'

The grinder took off all the old paint and rust from the feet. I picked a plum purple spray paint.

Since there are no cushions for the bottom of a tub, we made our own! We bought 3 yards of material. Also, make sure it is material that can stand wear and tear.

Draw the outline of the cushion on the foam.

Cut out the material and sew the patterned sides together.

Turn the material inside out and stuff the foam into it. You may need to stuff the corners of the cushion with stuffing so it will give it a smoother look.
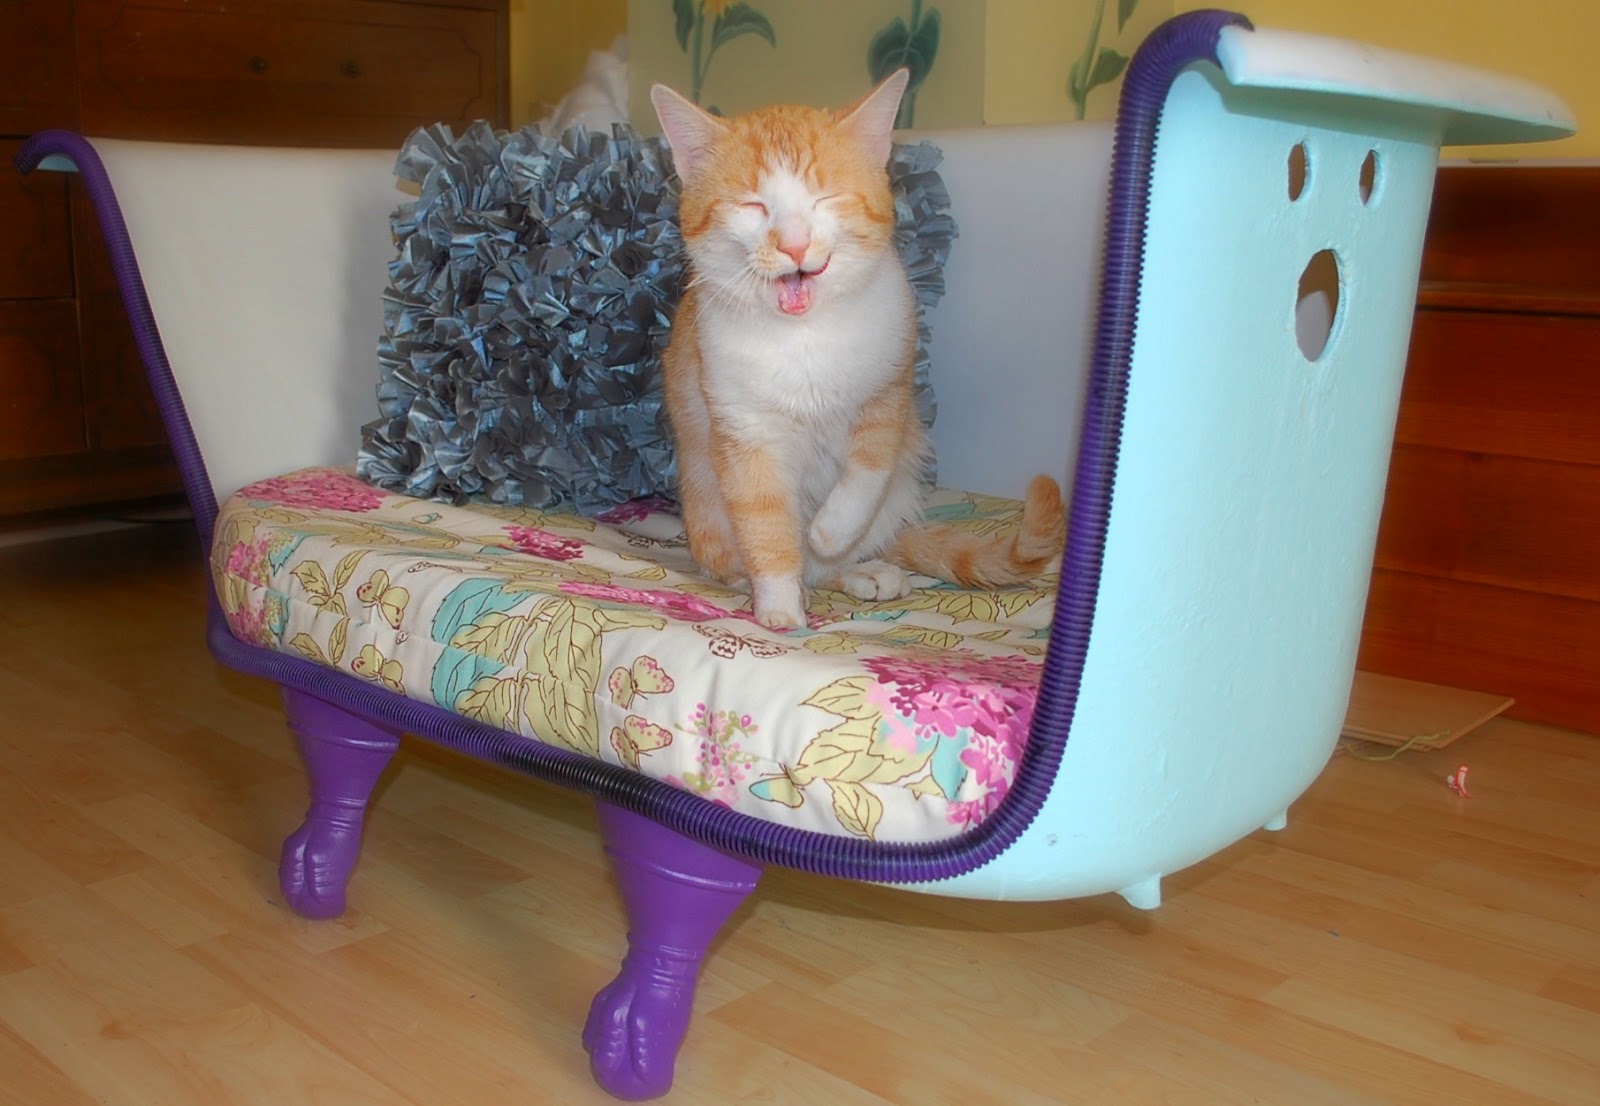
This is the Love Tub all finished! Oh and that is my cat Pickle!
Subscribe to:
Posts (Atom)